> ## Documentation Index
> Fetch the complete documentation index at: https://docs.flow-board.co/llms.txt
> Use this file to discover all available pages before exploring further.
# Quick start
> Create, publish, and launch your first Flowboard flow in a React Native, Expo, Flutter, native iOS, or native Android app.
Create your first flow in Flowboard Studio, connect it to your app, and launch it with the SDK.
This guide keeps the same implementation path most teams follow:
* Create an app in Flowboard Studio
* Build and publish a flow
* Generate a read-only API key
* Install the SDK
* Initialize Flowboard in your app
* Launch the flow and verify the integration
## Before you begin
Make sure you have:
* Access to [Flowboard Studio](https://studio.flow-board.co/)
* An existing mobile app in **React Native**, **Expo development build**, **Flutter**, **native iOS**, or **native Android**
* Your app identifier ready:
* **iOS**: bundle ID
* **Android**: package name
* Permission to add a new SDK dependency to your app
Expo Go is not supported because Flowboard uses native modules. Use an Expo development build, `expo prebuild`, or EAS Build instead.
## What you will set up
By the end of this guide, you will have:
* One published flow in Flowboard Studio
* One API key with read access for flows
* Flowboard initialized in your app
* A button or trigger that launches the flow
## 1. Create an app in Flowboard Studio
Open [Flowboard Studio](https://studio.flow-board.co/) and create a new app.
When you create the app, add the identifiers you want Flowboard to target. This ensures the correct configuration is resolved when your app requests a flow.
Recommended details to configure early:
* App name
* iOS bundle ID
* Android package name
* Environment or workspace conventions your team uses
## 2. Create and publish your first flow
Inside your app workspace in Studio:
1. Create a new flow.
2. Start from **AI**, a **template**, or a **blank flow**.
3. Add the screens and actions you need.
4. Review the default audience or distribution rules.
5. Publish the flow.
If you want the fastest path to a working demo, start with a template, keep the audience broad, and publish a simple 2 to 4 step flow first.
Before moving on, confirm:
* The flow is in **published** state
* The flow is assigned to an audience or otherwise available for launch
* You know whether you want to launch the default flow or a specific flow ID
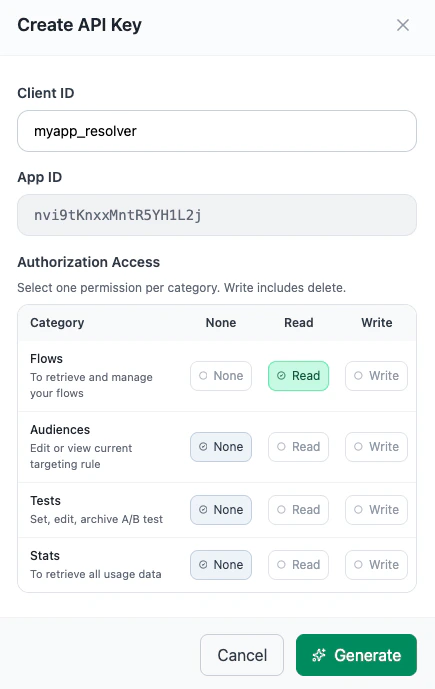
## 3. Create an API key
Your app needs an API key so the SDK can retrieve published Flowboard data.
To generate it:
1. Open your app in Studio.
2. Go to the app configuration page.
3. Scroll to the **API keys** section.
4. Create a new key for the mobile app integration.
Use the smallest scope possible. For most mobile integrations, a read-only key for flows is the correct default.
Store the key securely and use environment-based configuration for production apps.
## 4. Install the SDK
Choose the setup that matches your app.
```bash Expo theme={null}
# Install the SDK
npx expo install flowboard-react
# Install and configure native dependencies
npx --package flowboard-react flowboard-setup --yes
```
```bash React Native theme={null}
# Install the SDK
npm install flowboard-react
# Install and configure peer dependencies
npx --package flowboard-react flowboard-setup --yes
```
```bash Flutter theme={null}
flutter pub add flowboard_flutter
```
```swift iOS (Xcode) theme={null}
/* File > Add Package Dependencies...
Repository:
https://github.com/Flowboard-Studio/flowboard-pckg-swift.git
Dependency rule:
Up to Next Major Version
Version:
1.0.0
Add these products to your target as needed:
- FlowboardSwiftUIKit
- FlowboardSwiftUI
- FlowboardSwiftCore */
// Add only the products you use in this target.
// FlowboardSwiftUIKit contains initialize(), launchOnboarding(), and launchOnboardingById().
dependencies: [
.package(url: "https://github.com/Flowboard-Studio/flowboard-pckg-swift.git", from: "1.0.0")
],
targets: [
.target(
name: "YourApp",
dependencies: [
// Add only the products you use in this target.
.product(name: "FlowboardSwiftUIKit", package: "flowboard-pckg-swift"),
.product(name: "FlowboardSwiftUI", package: "flowboard-pckg-swift"),
.product(name: "FlowboardSwiftCore", package: "flowboard-pckg-swift")
]
)
]
/*
`Flowboard.initialize(...)`, `launchOnboarding(...)`, and `launchOnboardingById(...)` live in `FlowboardSwiftUIKit`. Use a valid Flowboard API token when you initialize, do that before the first launch, add `FlowboardSwiftUI` when you want to render a `FlowboardScreen` inside SwiftUI, and make sure your app can access the network when you load published flows remotely.
*/
```
## 5. Initialize Flowboard
Initialize Flowboard as early as possible during app startup, and wrap your app with the provider when using the React Native SDK.
```tsx Expo theme={null}
// app/_layout.tsx
import { Stack } from 'expo-router';
import { Flowboard, FlowboardProvider } from 'flowboard-react';
Flowboard.init({
apiToken: 'YOUR_API_TOKEN',
debug: true,
});
export default function RootLayout() {
return (
);
}
```
```tsx React Native theme={null}
// index.js
import 'react-native-get-random-values';
// App.tsx
import { useEffect } from 'react';
import { Flowboard, FlowboardProvider } from 'flowboard-react';
export default function App() {
useEffect(() => {
Flowboard.init({
apiToken: 'YOUR_API_TOKEN',
debug: true,
});
}, []);
return (
);
}
```
```dart Flutter theme={null}
// lib/main.dart
import 'package:flutter/widgets.dart';
import 'package:flowboard_flutter/flowboard_flutter.dart';
void main() {
WidgetsFlutterBinding.ensureInitialized();
Flowboard.init(
apiToken: 'YOUR_API_TOKEN',
debug: true,
);
runApp(const MyApp());
}
```
```swift iOS theme={null}
import FlowboardSwiftUIKit
Flowboard.initialize(
apiToken: "YOUR_API_TOKEN",
debug: true
)
```
```kotlin Android theme={null}
import co.flowboard.view.Flowboard
Flowboard.initialize(
context = applicationContext,
apiToken = "YOUR_API_TOKEN",
debug = true
)
```
Set `debug: false` in production.
## 6. Launch your flow
Add a simple trigger in your app so you can confirm the integration end to end.
```tsx Expo / React Native theme={null}
import { Button } from 'react-native';
import { Flowboard } from 'flowboard-react';
const startFlow = async () => {
try {
await Flowboard.launchOnboarding({
onOnboardEnd: (formData) => {
console.log('Flow finished:', formData);
},
});
} catch (error) {
console.error('Failed to launch Flowboard:', error);
}
};
export function LaunchFlowButton() {
return ;
}
```
```dart Flutter theme={null}
import 'package:flutter/material.dart';
import 'package:flowboard_flutter/flowboard_flutter.dart';
class LaunchFlowButton extends StatelessWidget {
const LaunchFlowButton({super.key});
@override
Widget build(BuildContext context) {
return ElevatedButton(
onPressed: () async {
await Flowboard.launchOnboarding(
context,
onOnboardEnd: (formData) {
debugPrint('Flow finished: $formData');
},
);
},
child: const Text('Start flow'),
);
}
}
```
```swift iOS theme={null}
import FlowboardSwiftUIKit
func startFlow() {
Task {
do {
try await Flowboard.launchOnboarding(
from: self,
options: .init(
onOnboardEnd: { formData in
print("Flow finished:", formData)
}
)
)
} catch {
print("Failed to launch Flowboard:", error)
}
}
}
```
```kotlin Android theme={null}
import androidx.lifecycle.lifecycleScope
import co.flowboard.core.FlowboardLaunchOptions
import co.flowboard.view.Flowboard
import kotlinx.coroutines.launch
fun startFlow() {
lifecycleScope.launch {
try {
val fragment = Flowboard.launchOnboarding(
activity = this@MainActivity,
options = FlowboardLaunchOptions(
onOnboardEnd = { formData ->
println("Flow finished: $formData")
}
)
)
// Host-managed cleanup
supportFragmentManager.beginTransaction().remove(fragment).commit()
} catch (error: Throwable) {
error.printStackTrace()
}
}
}
```
If your setup requires launching a specific published flow, use the flow ID from Studio instead of the default launcher.
## 7. Verify the integration
Run the app and trigger the flow.
You should verify that:
* The SDK initializes without errors
* The published flow opens in the app
* Screen transitions work as expected
* Completion callbacks fire at the end of the flow
## Troubleshooting
Check that:
* Your API token is valid
* The flow is published
* The flow is assigned to an audience that matches your device or app context
* Your app was rebuilt after installing the SDK
Clean the generated native project and reinstall dependencies, then rebuild:
```bash theme={null}
rm -rf ios/build
rm -rf node_modules
npm install
npx expo prebuild --clean
npx expo run:ios
```
Make sure you are not testing inside Expo Go, and confirm that all native dependencies required by `flowboard-setup` were installed successfully.
## Next steps
After your first successful launch, the next common steps are:
* Refine the audience targeting
* Add analytics or completion tracking
* Launch a specific flow by ID
* Create variants for experimentation
* Add custom native screens where needed
Need help with setup or migration? Contact [greg@flow-board.co](mailto:greg@flow-board.co).
 Store the key securely and use environment-based configuration for production apps.
## 4. Install the SDK
Choose the setup that matches your app.
Store the key securely and use environment-based configuration for production apps.
## 4. Install the SDK
Choose the setup that matches your app.